☁ 꼭 쓰려고만 하면 기억이 안 나는 나를 위해 정리한 vector 사용법이다.
추후에 새로 알게 된 정보도 추가해나가려고 한다!
vector의 기본 정리
[C++] STL vector 정리
C++ STL(Standard Template Library, 표준 템플릿 라이브러리)의 시퀀스 컨테이너(Sequence Container) 중 하나인 vector에 대해 알아보자. ✒ 시퀀스 컨테이너(Sequence Container)란?시퀀스 컨테이너(Sequence Container)
mojing.tistory.com
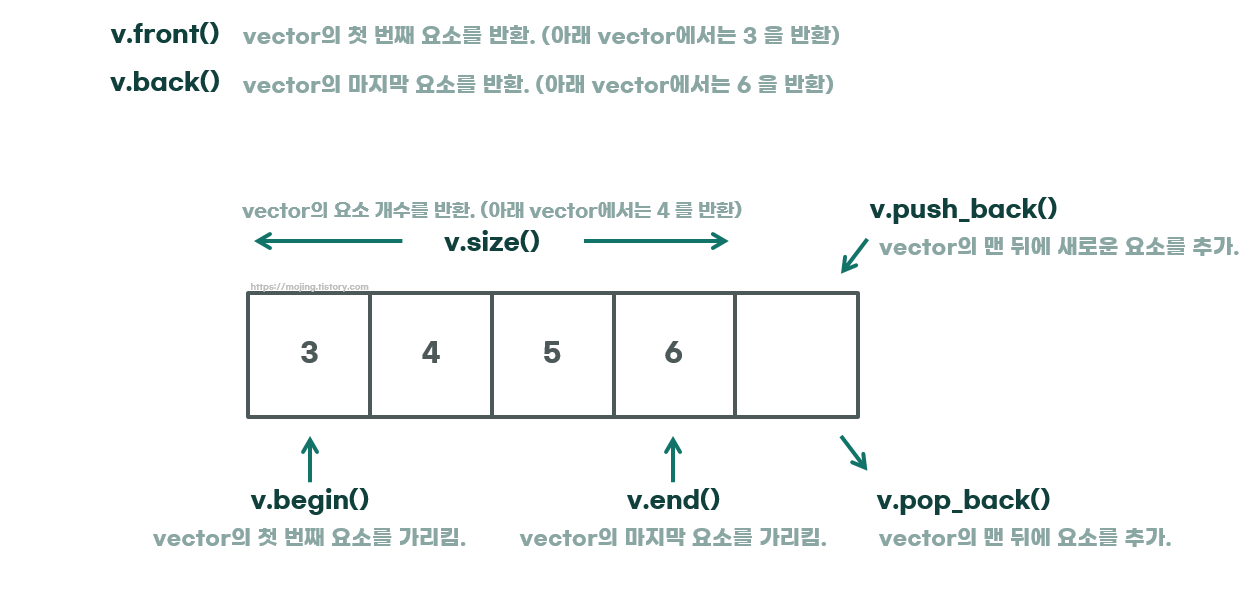
vector의 구조
vector 사용법
- #include <vector>
- using namespace std;
vector 헤더 파일은 반드시 추가해 주어야 하며, std::를 생략하기 위해 네임스페이스도 사용할 수 있다.
🐾 위의 네임스페이스를 생략하면 아래 예제의 모든 vector를 std::vector로 써야 한다.
vector 생성자
기본 생성자
vector<int> v;
- 비어있는 정수형(int) 벡터를 생성
초기 크기와 기본값을 지정한 생성자
vector<int> v(10);
- 크기가 10인 벡터 생성, 모든 요소는 기본값 0으로 초기화
vector<int> v(10, 5);
- 크기가 10인 벡터 생성, 모든 요소는 5로 초기화
초기화 리스트를 사용한 생성자
vector<int> v = {1, 2, 3, 4, 5};
vector<int> v{1, 2, 3, 4, 5};
- 초기화 리스트를 사용하여 벡터 생성
다른 벡터를 복사하여 생성
vector<int> v1 = v2;
vector<int> v1(v2);
- 벡터 v2를 복사하여 벡터 v1를 생성
범위를 지정하여 생성
list<int> lst = {1, 2, 3, 4, 5};
vector<int> v(lst.begin(), lst.end());
- 리스트의 범위를 사용하여 벡터 생성
int arr[ ] = {1, 2, 3, 4, 5};
vector<int> v(arr, arr + 5);
- 배열의 범위를 사용하여 벡터 생성
이동 생성자
이 예제는 std::를 생략하지 않았습니다.
std::vector<int> v1 = {1, 2, 3, 4, 5};
std::vector<int> v2 = std::move(v1);
- v1의 데이터를 v2로 이동
- 이동 생성자는 원본 벡터(v1)의 데이터를 새로운 벡터(v2)로 이동시키며, 원본 벡터는 비워짐
vector 요소 추가 및 삭제
v.push_back(3);
- 벡터의 마지막에 3을 추가
v. pop_back();
- 벡터의 마지막 요소 제거
v.insert(3, 10);
- 지정된 위치(Index[3])에 요소 10을 삽입
v.erase(3);
- 지정된 위치(Index[3])의 요소를 제거
v.clear();
- 벡터의 모든 요소를 제거
vector 요소 접근
v[3];
- 인덱스를 통해 요소에 접근
- Index[3]에 접근
v.at(3);
- 인덱스를 통해 요소에 접근하며, 범위 검사도 수행 (= 속도 느림)
v.front();
- 벡터의 첫 번째 요소 접근
v.back();
- 벡터의 마지막 요소에 접근
vector 크기 및 용량
v.size();
- 벡터의 현재 크기(=요소의 개수)를 반환
v.capacity();
- 벡터의 현재 용량을 반환
v.empty();
- 벡터가 비어 있는지 확인
v.resize(5);
- 벡터의 크기를 5로 조정
- size를 변경한다
v.reserve(5);
- 벡터의 용량을 미리 5로 예약
vector 반복자
v.begin();
- 벡터의 첫 번째 요소를 가리키는 반복자를 반환
v.end();
- 벡터의 마지막 요소 다음을 가리키는 반복자를 반환
v.rebegin();
- 역방향 반복자의 시작을 반환
v.rend();
- 역방향 반복자의 끝을 반환
반복자 사용 예시
#include <vector>
#include <iostream>
using namespace std;

int main() {
    vector<int> v = { 1, 2, 3, 4, 5 };

    // 정방향 반복자를 사용한 순회
    cout << "정방향 순회: ";
    for (auto it = v.begin(); it != v.end(); ++it) {
        cout << *it << ' ';
    }
    cout << endl;	// 정방향 순회: 1 2 3 4 5

    // 역방향 반복자를 사용한 순회
    cout << "역방향 순회: ";
    for (auto rit = v.rbegin(); rit != v.rend(); ++rit) {
        cout << *rit << ' ';
    }
    cout << endl;	// 역방향 순회: 5 4 3 2 1

    return 0;
}
vector 정렬
#include <algorithm>을 추가 해야 한다!
sort(v.begin(), v.end());
- 벡터를 오름차순으로 정렬
sort(v.rbegin(), v.rend());
- 벡터를 내림차순으로 정렬
정렬 사용 예시
#include <algorithm>
#include <vector>
#include <iostream>
using namespace std;

int main() {
    vector<int> v = { 3, 1, 4, 1, 5, 9, 2 };

    sort(v.begin(), v.end());

    cout << "정렬된 벡터: ";
    for (int num : v) {
        cout << num << " ";
    }
    cout << endl;

    return 0;
}
vector 유용한 함수
v1.swap(v2);
- 두 벡터의 요소를 교환
v1.assign(v2.begin(), v2.end());
- 다른 컨테이너나 반복자의 범위를 사용하여 벡터의 내용을 설정
- 먼저 기존 요소를 지우고, 지정된 요소 범위를 벡터에 삽입
위 함수 사용 예시
#include <vector>
#include <iostream>
using namespace std;

int main() {
    vector<int> v1 = { 1, 2, 3, 4, 5 };
    vector<int> v2 = { 10, 20, 30 };

    // 두 벡터의 내용 교환
    v1.swap(v2);

    cout << "v1: ";
    for (int n : v1) cout << n << ' ';
    cout << endl;   // v1: 10 20 30

    cout << "v2: ";
    for (int n : v2) cout << n << ' ';
    cout << endl;   // v2: 1 2 3 4 5

    // 다른 컨테이너를 사용하여 벡터의 내용 설정
    vector<int> v3;
    v3.assign(v2.begin(), v2.end());

    cout << "v3: ";
    for (int n : v3) cout << n << ' ';
    cout << endl;   // v3: 1 2 3 4 5

    return 0;
}
vector 출력
배열처럼 출력하기
#include <iostream>
#include <string>
#include <vector>
using namespace std;

int main() {
    //-- int형 vector 출력----------------------------------------------------
    vector<int> numbers = { 1, 2, 3, 4, 5 };

    for (int i = 0; i < numbers.size(); ++i) {
        cout << numbers[i] << " ";
    }
    // 출력: 1 2 3 4 5


    //. at()을 이용해서 출력한 예시
    for (int i = 0; i < numbers.size(); ++i) {
        cout << numbers.at(i) << " ";
    }
    // 출력: 1 2 3 4 5


   //-- string형 vector 출력-------------------------------------------------
   vector<string> words = { "Hello", "this", "is", "Mojing’s", "Dev", "Blog" };

   for (int i = 0; i < words.size(); ++i) {
       cout << words[i] << " ";
   }
   // 출력: Hello this is Mojing’s Dev Blog


    return 0;
}
범위 기반 for 루프를 사용한 출력
#include <iostream>
#include <string>
#include <vector>
using namespace std;

int main() {
    //-- int형 vector 출력----------------------------------------------------
    vector<int> numbers = { 1, 2, 3, 4, 5 };

    for (int number : numbers) {
        cout << number << " ";
    }
    // 출력: 1 2 3 4 5


    //-- string형 vector 출력-------------------------------------------------
    vector<string> words = { "Hello", "this", "is", "Mojing’s", "Dev", "Blog" };

    //. 값 복사를 사용해서 출력
    for (string word : words) {
        cout << word << " ";
    }
    // 출력: Hello this is Mojing’s Dev Blog


    //. 값 복사를 사용해서 데이터 수정 및 출력 (원본 데이터는 변경x)
    for (string word : words) {
    	// 여기서 word를 변경할 수 있다.
    	word = "Modified";  // 예시
        cout << word << " ";
    }
    // 출력: Modified Modified Modified Modified Modified Modified
    // (원본 데이터: Hello this is Mojing’s Dev Blog)


    //. const를 사용하여 원본 데이터에 대한 수정을 막고,
    //  strign&을 사용하여 "복사하지 않고" 변수에 접근
    for (const string& word : words) {
        cout << word << " ";
    }
    // 출력: Hello this is Mojing’s Dev Blog


    //. 참조를 통해 요소의 값(원본 데이터)을 변경할 수도 있다.
    for (string& word : words) {
        // 여기서 word를 변경할 수 있다.
        word = "Modified";  // 예시
        cout << word << " ";
    }
    // 출력: Modified Modified Modified Modified Modified Modified
    // 원본 데이터: Modified Modified Modified Modified Modified Modified

    return 0;
}
- 값 복사를 사용하여 출력하는 경우는 말 그대로 각 요소가 복사되므로 메모리와 CPU 자원을 더 많이 사용한다.
- for문에 const를 사용하는 이유는 루프 내부에서 실수로 변수가 변경되는 것을 방지하고, 데이터가 불변임을 명확히 명시하기 위함이다!
- string&를 사용하는 이유는 "참조"를 사용하여 문자열을 복사하지 않고 접근한다. 불필요한 메모리 할당과 복사 비용이 줄어드는 장점이 있다. (요소의 크기가 크거나 복사 비용이 높은 경우에 더 큰 차이를 보인다.)
정리하자면,
- 값 복사 방식
- string 타입의 변수가 복사되므로 원본 데이터가 변경되지 않는다.
- 참조 방식
- string& 타입의 변수가 원본 데이터를 참조하므로, 변경이 원본 데이터에 반영된다.
반복자 (Iterator)를 사용한 출력
#include <iostream>
#include <string>
#include <vector>
using namespace std;

int main() {
    //-- int형 vector 출력----------------------------------------------------
    vector<int> numbers = { 1, 2, 3, 4, 5 };

    for (vector<int>::iterator it = numbers.begin(); it != numbers.end(); ++it) {
        cout << *it << " ";
    }
    // 출력: 1 2 3 4 5


   //-- string형 vector 출력-------------------------------------------------
   vector<string> words = { "Hello", "this", "is", "Mojing’s", "Dev", "Blog" };

   for (vector<string>::iterator it = words.begin(); it != words.end(); ++it) {
       cout << *it << " ";
   }
   // 출력: Hello this is Mojing’s Dev Blog


   //. 더 간단하게 auto키워드 사용한 예시 (타입 추론)
   for (auto it = words.begin(); it != words.end(); ++it) {
       cout << *it << " ";
   }
   // 출력: Hello this is Mojing’s Dev Blog


   //. 역순 출력: rbegin(), rend()를 이용한 예시
   for (auto it = words.rbegin(); it != words.rend(); ++it) {
       cout << *it << " ";
   }
   // 출력: Blog Dev Mojing’s is this Hello


    return 0;
}
참고
https://learn.microsoft.com/ko-kr/cpp/standard-library/vector-class?view=msvc-170#assign
vector 클래스
클래스 벡터의 Microsoft C++ 표준 라이브러리 구현에 대한 참조입니다.
learn.microsoft.com
'💻 Programming > C++' 카테고리의 다른 글
| [C++/컴파일 에러] error: cannot jump from switch statement to this case label 에러 해결 및 원인 (0) | 2024.07.23 |
|---|---|
| [C++] STL(Standard Template Library) 정리 (0) | 2024.07.04 |
| [C++] STL vector 정리 (0) | 2024.07.03 |